Uniform
Super Smart Cadets from a squadron not related to mine....
This is a prime example of an exceptionally smart Cadet squadron that is not related to me in anyway.....
Beret
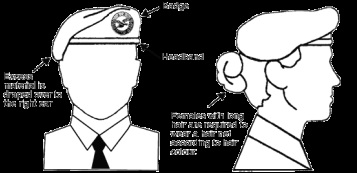
The Beret is to be worn with the leather band completely horizontal across the forehead and about 2 fingers above the eyebrows. The cap badge should be clearly visible above the left eye. The excess material should be draped over the right ear, at least touching the top of the ear but it cannot be more than halfway down.
Females with long hair must wear a hair net that matches the colour of their hair, or as close as.
How to shape it
Place your beret in warm water, ensuring the water is not TOO hot.
Once you get it's soaking, stick it on your head and pull the badge fowards over your left eye and smooth the material over your head and pull it down by your right ear.
Hold the beret in that position for a while, occassionally smoothing the material again. Wear your beret until it's nearly dry and then take it off and put it on the edge of a cupboard so that the excess material is still draped.
You may need to repeat this step a few times before you get a truely awesome beret!
Uniform Shirts
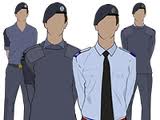
Shirts look great when they're ironed correctly so here's how to do it.
- Iron the INSIDE of the collar, never iron the outside as you get shiny white marks
- Unbutton and iron the epaulettes flat
- Place one front side of the shirt on the ironing board so the neck is at the end on the board, now iron that, making sure you iron out the little lines that you will get above the pocket
- Now place the back of your shirt on the board and iron
- Now do the other front side.
- Now the hard part. Sleeves. Place the sleeve along the length of the ironing board. Use a good water sprayer and spray the crease - not too much though. Place the iron at the cuff end of the sleeve while pulling the crease to keep it tight. Press firmly on the iron and steadily move up to the shoulder end of the sleeve. Repeat for the other side of the sleeve and then repeat for the other sleeve and you should have a perfect pair of creases.
The Wedgewood Uniform Tie

This image is pretty self explanitory, follow the basic steps outlined in the picture on the left and you'll have it!
Trousers

u8Sorry, I don't really have a good picture for this...Trousers have a big impact on your overall appearance and you can see a good pair of creases from a mile away! So here's how to do them correctly.
- Place the trousers onto the ironing board with the creases lined up. Fold one leg up, leaving you with one leg to iron for now.
- Pull both ends of the crease to make certain that no material is creased underneath
- Spray the crease with water
- Place the iron on the crease and press down firmly, slowly move the iron up the crease. Repeat this as many times as you want, you can only make it better!
- Now flip that trouser leg and do the same on the other side
- 1st LEG DONE!
- Now repeat steps 1-4 with the other leg
- You now have nice trousers. Congratulations.
Belt
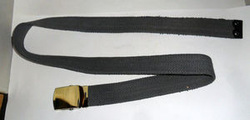
The Belt is to be cut down to the correct size when you first obtain it. The end with the black metal should be able to go through the first loop on your trousers when comfortably fastened.
The brass buckle should be polished to a high shine using Brasso or other brass metal cleaner/polisher. The brasso should be applied generously and left for a minute to begin to dry. When the brasso goes a cloudy colour, begin to buff it off with a smooth rag or a piece of cotton wool.
The brass buckle should be polished to a high shine using Brasso or other brass metal cleaner/polisher. The brasso should be applied generously and left for a minute to begin to dry. When the brasso goes a cloudy colour, begin to buff it off with a smooth rag or a piece of cotton wool.
Brassard

The Brassard is worn in both working blues and wedgewood blues on the right arm of the shirt or jumper. The top of the brassard goes through the epaulet (fabric strap) where ranks slides go.
Also, if you have just joined the Air Cadets then you will be given a brassard, an Identification Badge (squadron number) and a distingushing badge (Air Training Corps badge).
You will need to sew these badge on in the positions shown on the diagram to the right>>>>>>>>>>>>>>>
Use thread of the same colour as the badge, or find the closest match.
SHOES!
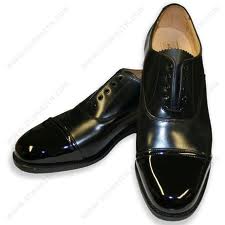
Shoes are one of the most important aspects of uniform. They usually tell you about the dedication a Cadet has to the ACO.
How to bull your shoes!
What you need:
Shoes,
Rag/cotton wool
KIWI BLACK POLISH (NOTHING ELSE)
Water.
Method:
First, a warning, polishing your shoes to a very high mirror shine will take hours of devotion and you may experience over protectiveness and have spasms if they are stepped on. These spasms can range from flailing arms and screaming to kicking them with your now ruined shoe. Anyway, how to do it.
Also, if you struggle with written instruction, here's a video on how to bull your shoes!
How to bull your shoes!
What you need:
Shoes,
Rag/cotton wool
KIWI BLACK POLISH (NOTHING ELSE)
Water.
Method:
First, a warning, polishing your shoes to a very high mirror shine will take hours of devotion and you may experience over protectiveness and have spasms if they are stepped on. These spasms can range from flailing arms and screaming to kicking them with your now ruined shoe. Anyway, how to do it.
- Ensure you shoe is completely free of dust or dirt.
- Wet your cloth/cotton wool by dipping it into the water. Squeeze out any excess
- Gently rub the cloth or piece of cotton wool along the shiny surface of the polish.
- Lightly rub the polish into the toe cap of your shoe in small, circular motions, covering the whole of the toecap, including the sides and tip. Repeat these circular motions until all the polish seems to have gone and does not smear when you rub it. If the surface of the shoe becomes dry, wet the duster or cotton wool again.
- When you first start polishing, you will feel that the surface of the toecap is rough. You will need to repeat the process above until the surface of the shoe is smooth, and remember to use lots and lots of water!
- The circular motion is a vital part of the process. The motion works the polish into the shoe and allows the polish to settle onto the surface of the shoe.
- Your shoe should now have a fairly smooth surface, compare you shined shoe with your unshined one and notice that your polished shoe now has a darker appearance to it.
- Now we finish off the toecap. It's basically the same process as above, but with a couple of changes. Only use a small amount of polish and a little more water. These smaller layers should only take about 30 seconds to apply, and you will need to apply only a few of these layers to attain a shine.
- Repeat this process will your other shoe
Also, if you struggle with written instruction, here's a video on how to bull your shoes!
Shuttys©
